Using the Microscope to Help get that I.D.
By Sue Lancelle and Jessica Benson Evans
It happens quite often. You find an interesting fungus while out and about. You take it home and carefully note all the physical features of the fungus, measure it, photograph it, and make a spore print to check the spore color. You use your field guides, keys and any other resources you can find, and you might not even come up with a possible genus. Aarrgghhhh . . . !
It is then time to try something else, and that means turning to the microscope. The most basic next step is to study the spores, and that is the focus of this article. In the next newsletter, we’ll talk about examining various hyphal structures with the microscope. This summer, we will be offering some microscopy workshops where you can investigate some of the micro-details of the fungi you find. You may find that once you have entered the fascinating world of fungal microscopy, there will be no turning back!

Figure 1. A spore print was made by placing part of the mushroom cap on a glass slide, and part on a piece of paper. This allows you to use the spores on the slide directly for microscopical study. J. Benson Evans
That spore print you made earlier? You can use it now to make a slide. Scrape off some of the spores and place them in a small drop of dilute soapy water (or 5-10% KOH if you have it). Alternatively, you can make a separate spore print directly on a slide with a small piece of the fungus (See Figure 1). Add the liquid and place a cover slip over it and have a look. You’ll want to start by using a 10X objective lens to get in focus, then move up to the 40X objective. With very small spores, you’ll want
to eventually use the 100X oil immersion objective lens. With careful (and continual) small adjustments of the fine focus knob, you can get a sense of the different structures of the spore, as well as its shape and any ornamentation on its outer wall. You should record your spore observations either by photographing them or drawing them.
Basidiomycetes
First, let’s consider spores of the basidiomycetes, which include the gilled fungi, the polypores, and the boletes. Note that an excellent reference book for examining basidiomycetes is How to Identify Mushrooms to Genus III: Microscopic Features by D. Largent, D. Johnson and R. Watling.
Figure 2 shows spores in a lateral (or side) view of the spore, where you can see the hyaline appendage, the attachment point of the spore to the spore bearing structure, or basidium. The other end of the spore is the apex, and in some species the apex looks cut off, or truncated. Remember that you are looking at a 3- dimensional object, and it is often necessary to understand which orientation the spore is in, because the shape can be different in different views.

Figure 2. Gomphidius smithii spore in KOH, showing a narrow ellipsoid shape, apex (or top) of the spore, and the hyaline appendage, where the spore attaches to the basidium, or spore bearing structure. B. Boletus truncatus. The apex, or top, of some spores is truncated, giving it a “cut off” look.
A: S. Lancelle, B: courtesy R. Halling.
Look carefully at the shape of the spores. While many fungal spores are ellipsoid, there are a wide variety of other shapes that you may encounter (Figure 3). There is a lot of terminology involved in describing spore shapes, and it helps to have a glossary nearby!

Figure 3. A few of the wide variety of spore shapes. A. Tylopilus bulbosus, subfusiform (narrowly spindle shaped). B. Pholiota limonella, ellipsoid. C. Nolanea, cuboidal. D. Pouzarella, polygonal. E. Inocephalus luteus, cuboidal. F. Entoloma sp., angular, 4-6- sided. G. Oudemansiella, subglobose. A, C, D, G: courtesy R. Halling; B, E, F: S. Lancelle
In addition to overall shape, it is important to note if the spores have any ornamentation on their outer walls. It often takes careful adjustments of the fine focus knob, and either closing down the iris diaphragm or using a stain to add some contrast to see spore ornamentation while using a typical light microscope, but with careful observation, you can usually see it. As with spore shape, there is a lot of terminology involved in describing spore ornamentation.
Again, remember that the spore is 3-dimensional, so you have to carefully focus on different planes to see different kinds of details like surface structure. Figure 4 shows a variety of spore ornamentation types, imaged with various techniques. Figures 4 I and J were made by combining stacks of 5 images photographed at different focal levels. The combined images have a very 3-dimensional quality.

Figure 4. Spore ornamentation. Some of these are tropical species, but they are excellent examples of the variety of ornamentation that you might see. A. Lepista nuda. The surface is minutely rough, and this ornamentation can often only be seen by staining with cotton blue. B. Austroboletus lacunosus shows irregular warts and flattened pegs. C. Strobilomyces floccopus. Melzer’s reagent stains the reticulations brown. D. Bondarzewia berkeleyi. Ornamentation is a combination of spikes and reticulations, stained in Melzer’s reagent. E. Russula sp. Species of Russula and Lactarius show a range of reticulations on their spores. Stained with Melzer’s reagent. F. Dactylosporina steffenii. Spiny ornamentation. G. Boletellus sinapipes. Ribbed ornamentation. H. Boletellus ananas. Ribbed and cross striate. I. Laccaria amethystina. Covered with small knobs. This is a stack of 5 images focused at slightly different levels. J. Lactarius gerardii. Reticulations as seen in a stack of 5 images. A-H: courtesy R. Halling. I: J: S. Lancelle
Spore Measurements
Now that you’ve carefully noted the shape and ornamentation of the spores and any staining reactions they show, the next very important step is to measure them. There are two ways to do this. The first requires that you have an ocular measuring scale in an eyepiece of the microscope you are using. You must use a stage micrometer to calibrate what each unit in your ocular scale represents, and this will be different for each magnification you are using. You can line up a spore with the ocular micrometer, and figure out how many units it measures, and then convert these to lengths in micrometers. A spreadsheet is very useful for this.
A second way to measure the spores is to photograph them, and then use measuring software to do the measurements. Many microscope cameras come with software that will do this, and there is also the very powerful (and free!) software available from the NIH called 'Image J’.
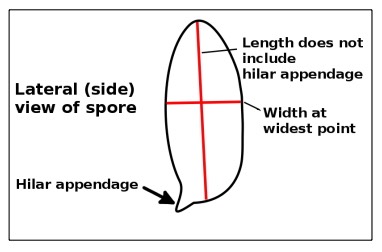
Figure 5. Measuring spores.
When measuring spores, you measure the length without including the hilar appendage (Figure 5). The width is measured at the widest point. If the spores have ornamentation, it is probably best to measure them both with and without the ornamentation, because you might see it reported either way. If the ornamentation is very prominent, it is usually measured and reported separately.
You should try to measure only mature spores, so getting them from a spore print is best. How many should you measure? To some extent, it depends on how much variation you are seeing, and what your sample is like. Sometimes you can only find 10 spores, so that is what you measure. Ideally, you measure at least 30.
Spore measurements are reported in a variety of ways, usually including a range. The simplest way to report itis this: 8-10 x 4-6 μm. This represents the range of lengths and widths that you measured, excluding the very extremes. There are other more complicated ways to report the measurements, but this is a good way to start.
Ascomycetes
Ascomycetes differ from basidiomycetes in that they carry their spores in a structure called an ascus (plural: asci). They include the “cup fungi” that are often very tiny, for example, many people are familiar with Bisporella citrina, the yellow fairy cup. Larger common ascomycetes include Galiella rufa, the “rubber cup.” But ascomycetes also include fungi such as morels and truffles.
Although microscopy can be a bit challenging, often spore details are the only way to make definitive species identifications. Many of the ascomycetes carry eight spores within their asci, but others offer varying numbers of ascospores; the number, size, and features of the spores are all key determinants to getting ascomycetes to genus and sometimes species. Spore measurements are carried out the same way they are for the basidiomycetes.
When preparing slides, you can sometimes use a very sharp razor to section a small portion of the specimen and place it in soapy water or KOH (Figure 6). Otherwise, the entire specimen (if less than one millimeter in diameter) can be placed onto the slide in liquid and the cover slip placed over it. Then, using a soft item such as the eraser of a pencil, press down carefully onto the top of the cover slip, taking care not to break the delicate glass. This creates what is called a “squash mount,” which forces the specimen into pieces and allows you to see the asci, which might otherwise have been obscured (Figures 7 and 8).

Figure 6. Fresh section of Morchella sp., a morel. A. Spores within ascus. B. Spores released from ascus. J. Benson Evans
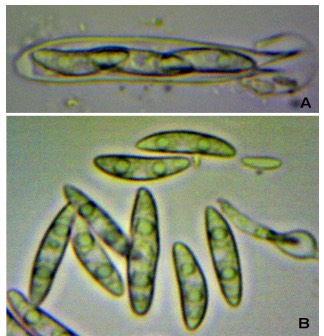
Figure 7. Squash mount of Ascocoryne sp. A. Spores within Figure 8. Squash mount of an as yet unidentified ascus. B. Spores released from ascus. J. Benson Evans ascomycete found growing on a wet clay sculpture. It is probably a member of the Pezizales order. A. Spores in an ascus. B. Spores released from ascus. J. Benson Evans
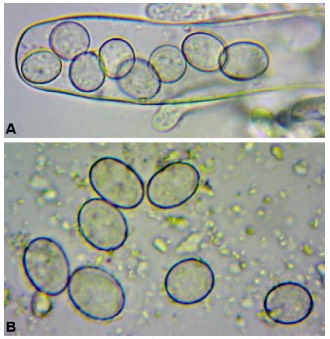
Figure 8. Squash mount of an as yet unidentified ascomycete found growing on a wet clay sculpture. It is probably a member of the Pezizales order. Photo by Jessica Benson Evans
There is no doubt that using the microscope to study fungal structures can be challenging. However, it is also a fascinating and rewarding endeavor. We would love to help you give it a try and we can all learn together. Watch for our schedule of microscopy workshops, which will be announced in early summer. We’d love to see you there!